- June 19, 2015
-
- Created the first version of this website.
During the lecture we will play in a playground environment. Get it here: playground.argos.
To execute ARGoS, fire up a terminal and type:
$ argos3 -c playground.argos
ARGoS (http://www.argos-sim.info) is a fast multi-robot simulator developed at IRIDIA. We will use it to work on the project.
To install ARGoS on your laptop, follow these instructions.
To tell the robots what to do, you need to write a script. The script is written in a language called Lua (v5.2). Lua is a very simple but powerful scripting language. You can find more information on the Lua manual. For nice tutorials, check The Lua Crash Course and the Lua Wikipedia page.
The table below contains a short reference with examples. It covers just the essential parts of the language you need to program the robots.
| Comments |
-- This is a single-line comment

--[[ This is a multiline
     comment ]]
|
| Variables |
-- assignment (no need to declare a variable)
x = 2.55   -- number
x = "ciao" -- string

-- printing on the ARGoS logger
log("INFO: x = " .. x)
logerr("ERROR: x = " .. x)

-- NOTE: in ARGoS, the standard Lua 'print()' function does not work
|
| Conditionals |
-- simple if/then
if x > 3 then
  logerr("x is too big")
end

-- if/then/elseif/else
if x > 3 then
  logerr("x is too big")
elseif x < 3 then
  logerr("x is too small")
else
  logerr("maybe I just don't like x")
end

-- checking for equality
if x == 3 then
  log("x is equal to 3")
end

-- checking for inequality
if x ~= 4 then
  log("x is different from 4")
end

-- combining conditions with OR
if (x > 3) or (x < 3) then
  logerr("x is not 3")
end

-- combining conditions with AND
if (x > 3) and (y > 3) then
  logerr("x and y are too big")
end

-- negating a condition
if not (x > 3) then
  logerr("x is <= 3")
end
|
| Loops |
-- 'while' loop to print 1 2 3 4 5
x = 0
while x < 5 do
  x = x + 1
  log(x)
end

-- 'repeat until' loop to print 1 2 3 4 5
x = 0
repeat
  x = x + 1
  log(x)
until x == 5

--[[ 'for' loop with increase/decrease of a variable:

       for x = init_value, end_value, step do ... end

     where:

       x = init_value initializes the counting variable x to init_value
       end_value      is the stopping value
       step           is the (optional) value to sum to x at each iteration
                      the loop continues:
                      - when x <= end_value, if step > 0
                      - when x >= end_value, if step < 0
]]

-- 'for' loop to print 1 2 3 4 5
for x = 1, 5 do
  log(x)
end

-- 'for' loop to print 1 3 5
for x = 1, 5, 2 do
  log(x)
end

-- 'for' loop to print 5 4 3 2 1
for x = 5, 1, -1 do
  log(x)
end
|
| Tables |
-- creating an empty table
t = {}

-- creating a table with some initial value
t = { x=3 }

-- using the contents of a table: two equivalent ways
log("t.x = " .. t.x)       -- dot syntax
log("t['x'] = " .. t["x"]) -- string syntax

-- printing the contents of a table: a custom function
function table.print(t)
  for key,value in pairs(t) do
    log(key .. " -> " .. value)
  end
end

-- tables are always passed by reference!
t1 = { x=3 }
t2 = t1      -- now t2 points to the contents of t1 -> no deep copy
t2.x = 5
log(t1.x)    -- prints 5, not 3!

-- copying tables the right way
function table.copy(t)
  local t2 = {}
  for key,value in pairs(t) do
    t2[key] = value
  end
  return t2
end
t1 = { x=3 }
t2 = table.copy(t1)
t2.x = 5
log(t1.x)    -- prints 3
log(t2.x)    -- prints 5

-- tables can be used as arrays
a = { "Huey", "Dewey", "Louie" } -- indices are assigned automatically starting from 1
log(a[1])                        -- prints "Huey"
log(a[2])                        -- prints "Dewey"
log(a[3])                        -- prints "Louie"
log(#a)                          -- prints the number of elements in a

-- sorting the contents of a simple table
a = { "Huey", "Dewey", "Louie" }
table.sort(a)  -- this operation modifies a!
table.print(a) -- prints "1 -> Dewey", "2 -> Huey", "3 -> Louie"

--[[ To sort the contents of a nested table, such as those in the robot,
     you need to specify a comparation function to tell the sort algorithm
     how to compare two table elements ]]

-- Take a nested table
t = {
  { x=4, label="Huey" },
  { x=56, label="Dewey" },
  { x=0.6, label="Louie" }
}

-- Sort it by x in increasing order
table.sort(t, function(a,b) return a.x < b.x end)

-- Sort it by x in decreasing order
table.sort(t, function(a,b) return a.x > b.x end)

-- Sort it by label in increasing order
table.sort(t, function(a,b) return a.label < b.label end)

-- Sort it by label in decreasing order
table.sort(t, function(a,b) return a.label > b.label end)
|
| Functions |
-- defining a function
function my_fun(p)
  log("Called my_fun(" .. p .. ")")
end

-- returning a value
function my_add(a, b)
  return a + b
end
|
| Math |
-- All the math functions are part of the 'math' table

-- Setting a 2D vector from length and angle
function vec2_new_polar(length, angle) {
  local vec2 = {
    x = length * math.cos(angle)
    y = length * math.sin(angle)
  }
  return vec2
}
v = vec2_new_polar(2, math.pi/3)

-- Summing two 2D vectors (v1 = v1 + v2)
function vec2_sum(v1, v2) {
  v1.x = v1.x + v2.x
  v1.y = v1.y + v2.y
}
v1 = { x=1, y=2 }
v2 = { x=3, y=1 }
vec2_sum(v1, v2)
table.print(v1)   -- prints "x -> 4", "y -> 3"

-- Getting the angle of a 2D vector
function vec2_angle(v) {
  return math.atan2(v.y, v.x)
}

--[[ NOTE: to get a random number, DO NOT use math.random(). Rather,
     use robot.random, described below. ]]
|
| Debugging |
-- Draw a red vector (10cm,10cm) and a green vector (5cm,10cm)
robot.vectors = { { x=10, y=10, color="red"   },
                  { x=5,  y=10, color="green" } }

-- Write the robot id and "ciao" on top of the robot
robot.message = robot.id .. " ciao"
|

The robot-related functions and data are stored in the robot table. For
instance, to set the robot wheel speed, you need to call
robot.wheels.set_velocity(2,3)
Analogously, To store the reading of the 4th proximity sensor in a variable named
r, you type
r = robot.proximity[4].value
NOTE: don't modify the values of the robot attributes. More specifically:
- Never write directly into the
robotattributesrobot.proximity[4].angle = 1.67 -- NO!
- Never apply operations such as
table.sort()to therobottabletable.sort(robot.proximity, function(a,b) return a.value > b.value end) -- NO!
- If you intend to use the values of a
robottable, copy that table first:myprox = table.copy(robot.proximity)table.sort(myprox, function(a,b) return a.value < b.value end)
robot.base_ground |
The base ground sensor reads the color of the floor.
It is a list of 8 readings, each containing a table composed of
value and offset. The value is either 0 or 1, where
0 means black (or dark gray), and 1 means white (or light gray). The offset
corresponds to the position read on the ground by the sensor. The position is
expressed as a 2D vector stemming from the center of the robot. The vector
coordinates are in cm.The difference between this sensor and the robot.motor_ground is
that this sensor returns binary readings (0 = black/1 = white), while
robot.motor_ground can distinguish different shades of gray.
|
 |
robot.distance_scanner |
The distance scanner is a rotating device with four sensors. Two sensors are
short-range (4cm to 30cm) and two are long-range (20cm to 150cm). Each sensor
returns up to 6 values every time step, for a total of 24 readings (12 short-range
and 12 long-range). Each reading is a table composed of angle in
radians and distance in cm. The distance value can also be -1
or -2. When it is -1, it means that the object detected by the sensor is closer
than the minimum sensor range (4cm for short-range, 20cm for long-range). When
a sensor returns -2, it's because no object was detected at all.This device is initially off. You need to use the enable() function
to switch it on. The function disable switches it off.
The function set_angle() locks the device at a specific angle, while
set_rpm(s) sets the angular speed of the device to s
(which must be a number). If you want to convert from radians per second to
RPMs, apply the following formula: RPM = 30/pi * radsec.
|
|
robot.gripper |
The gripper allows a robot to connect to objects such as boxes and cylinders, or
other robots. A robot attached to a passive object can transport it, if it is
light enough. To lock the gripper, you use lock_positive() or
lock_negative(). They both do the same job, so you can call the one
you prefer. To unlock the gripper (thus releasing the attached object), use
unlock().
|
 |
robot.id |
A string containing the id of the robot. | |
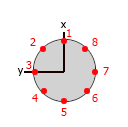
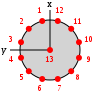
robot.leds |
Sets the color of the robot LEDs. The robot has a
total of 13 RGB LEDs. 12 of them are arranged in a
ring around the robot body, and one (also called
the beacon) is positioned at the top of
the robot body. To set the colors of a single LED, use set_single_color(idx,
color). idx is the number of
the LED to set (1-12 for the body LEDs, 13 for the
beacon). color can be expressed as a
string, such
as "red", "green", "blue",
etc., or as a triplet of
numbers r,g,b.To set all colors at once, use set_all_colors(color). The color
parameter works like set_single_color(idx,
color).
|
 |
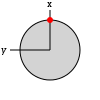
robot.light |
The light sensor allows the robot to detect light
sources. The robot has 24 light sensors, equally
distributed in a ring around its body. Each sensor
reading is composed of an angle in
radians and a value in the range
[0,1]. The angle corresponds to where the sensor
is located in the body with respect to the front
of the robot, which is the local x
axis. Regarding the value, 0 corresponds to no
light being detected by a sensor, while values
> 0 mean that light has been detected. The
value increases as the robot gets closer to a
light source.
|
 |
robot.motor_ground |
The motor ground sensor reads the color of the floor.
It is a list of 4 readings, each containing a table composed of
value and offset. The value goes from 0 or 1, where
0 means black, and 1 means white. The offset corresponds to the position read
on the ground by the sensor. The position is expressed as a 2D vector stemming
from the center of the robot. The vector coordinates are in cm.The difference between this sensor and the robot.base_ground is
that this sensor can distinguish different shades of gray, while
robot.base_ground returns binary readings (0 = black/1 = white).
|
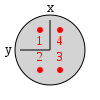 |
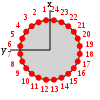
robot.proximity |
The proximity sensors detect objects around the robots. The sensors are 24 and are
equally distributed in a ring around the robot body. Each sensor has a range of 10cm
and returns a reading composed of an angle in radians and a value
in the range [0,1]. The angle corresponds to where the sensor is located in the body with
respect to the front of the robot, which is the local x axis. Regarding the value,
0 corresponds to no object being detected by a sensor, while values > 0 mean that an object
has been detected. The value increases as the robot gets closer to the object.
|
 |
robot.random |
This table offers a set of functions to draw random numbers from a distribution. Use bernoulli() to get either 0 or 1 from a
Bernoulli
distribution with p=0.5. You can also write bernoulli(p) to set
a different value for p.Use exponential(m) to get a random number from an
exponential
distribution with mean m.Use gaussian(s) to get a random number from a
Gaussian
distribution with standard deviation s and zero mean. You can also
write gaussian(s,m) to set a non-zero mean.Use uniform() to get a random number from a
uniform
distribution in the range [0,1). Alternatively, you can use uniform(max)
to get a number between 0 and max, or
uniform(min,max) to get a number between min and
max. If you want integer numbers, use the functions
uniform_int(max) and uniform_int(min,max).
|
|
robot.range_and_bearing |
The range-and-bearing system allows robots to perform localized communication.
Localized communication means that a robot, upon receiving data from another robot, also
detects the position of the sender with respect to its local point of view. It is important
to notice that the range-and-bearing system is not like WiFi. First, because two robots can exchange
data only if they are in direct line of sight - if an object is between two robots, the robots
can't communicate. Second, because robots that send data can only broadcast it in a limited area -
you can't pick who you talk to as you would with an IP address. Third, the robots can exchange only
10 bytes of data. To set the data to broadcast, use set_data(). This function accepts input in two forms.
You can write set_data(idx, data), and this means that you set the idx-th
byte to the value of data. data must be a number in the range [0,255].
Alternatively, you can write set_data(data), where data must be a table
containing exactly 10 numbers in the range [0,255].At each time step, a robot receives a variable number of messages from nearby robots. Each message is stored in a table composed of data (the 10-bytes message payload),
horizontal_bearing (the angle between the robot local x axis and the position
of the message source; the angle is on the robot's xy plane, in radians),
vertical_bearing (like the horizontal bearing, but it is the angle between the message
source and the robot's xy plane), and range (the distance of the message
source in cm).
|
|
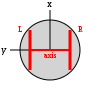
robot.wheels |
The real robot moves using two sets of wheels and tracks called treels. For simplicity,
we treat the treels like normal wheels. To move the robot, use set_velocity(l,r) where l and r are
the left and right wheel velocity, respectively. By 'wheel velocity' we mean linear velocity.
In other words, if you say set_velocity(5,5), the robot will move forward at 5cm/s.You can get some information about robot motion and wheels, too. axis_length is the distance
between the two wheels in cm. velocity_left and velocity_right store the current
wheel velocity. distance_left and distance_right store the linear distance
covered by the wheels in the last time step.
|
 |
robot.turret |
The foot-bot gripper is attached to a rotating device called the gripper. You can control the gripper
by either setting its rotation, or its rotational speed. To set its rotation, you must first call the
method set_position_control_mode() to switch the gripper to position control mode, and then
call set_rotation(angle) to rotate the gripper at angle angle. Alternatively,
you can set the rotational speed by calling set_speed_control_mode() first, and then
set_rotation_speed(speed). With set_passive_mode() you instruct the gripper
to be in a state in which, as the robot moves with an object gripped, the turret rotates due to the
weight of the gripped object.
|
|
robot.colored_blob_omnidirectional_camera |
This device returns a list of colored blobs, along with their position with respect to the robot center.
A colored blob in ARGoS corresponds to an LED. The list of blobs varies in size over time, depending on
what the robots sees. To start collecting data, you need to call enable(). To stop, call
disable().
|
Technical Information
In this section you'll learn how to run the challenge project. You must download a package that contains the necessary files to execute the experiment:
- The
.argosconfiguration file; - The loop functions (i.e., the logic to gather the data) in source format.
To run the experiment you need some setup explained in the following.
Setting up the Code
- To correctly execute the experiment code, you need to have a version of ARGoS equal or newer than 3.0.0-beta35.
To check your current version of ARGoS, type at the command prompt:
$ argos3 --version
- Download the experiment files: PLOW2015_v1.0.tar.bz2.
- Unpack the archive and compile the code:
$ tar xvf PLOW2015_v1.0.tar.bz2            # Unpacking
$ cd PLOW2015                              # Enter the directory
$ mkdir build                              # Creating build dir
$ cd build                                 # Entering build dir
$ cmake -DCMAKE_BUILD_TYPE=Release ../src  # Configuring the build dir
$ make                                     # Compiling the code
- Set the environment variable
ARGOS_PLUGIN_PATHto the full path in which thebuild/directory is located:$ export ARGOS_PLUGIN_PATH=/path/to/PLOW2015/build/
You can also put this line into your$HOME/.bashrcfile, so it will be automatically executed every time you open a console. - Run the experiment to check that everything is OK:
$ cd /path/to/PLOW2015      # Make sure you are in the right directory
$ argos3 -c challenge.argos # Run the experiment
If the ARGoS GUI appears, you're ready to go.
Setting up the Experiment
Loading a script at init time. When you
launch ARGoS without visualization, you can't use the GUI to
set the running script. However, you can modify the XML
configuration file to load automatically a script for
you. At line 46 of challenge.argos
you'll see that the Lua controller has an empty
section <params />. An example of how to
set the script is at line 49 of the same file. Just comment
line 46, uncomment line 49 and set the script
attribute to the file name of your script.
Changing the random seed. When you want to
run multiple repetitions of an experiment, it is necessary
to change the random seed every time. To change the random
seed, set the value at line 11
of challenge.argos,
attribute random_seed. If you want a different
random seed for every experiment, just remove
the random_seed attribute altogether. The seed
will be chosen using the computer clock and logged on the
terminal (standard out).
Changing the number of robots. If you want
to increase or decrease the number of robots taking part in
the experiment, change the quantity attribute
at line 81 of challenge.argos.
Making ARGoS faster. Sometimes ARGoS is
a little slow, especially when many robots and many sensors
are being simulated. You can make ARGoS go faster by setting
the attribute threads at line 9
of challenge.argos. Experiment with the
values, because the best setting depends on your computer.
MyTable = {}
MyTable.__index = MyTable
and then select a robot, ARGoS gets slow and
eventually crashes. What's wrong?This is a known issue with the variable state widget of the Lua editor in ARGoS, but there is a workaround. Do something like this:
MyTable = {}
MyTable_mt = {}
MyTable.__index = MyTable_mt
Sure. Just remove the
random_seed attribute from
the <experiment> section.